Krittapon Phacharoen
Krittapon's github web
Use Zigbee2MQTT for Linux in Ubuntu
Zigbee2MQTT คืออะไร
Zigbee2MQTT เป็นเสมือนตัวกลางในการสื่อสารระหว่างอุปกรณ์ ZigBee และ Protocal MQTT โดยมีอุปกรณ์ประเภท ZigBee Coordinator - USB Adapter / Dongle เป็นอุปกรณ์ที่ทำให้คอมพิวเตอร์สามารถสื่อสารได้
ZigBee USB Adapters
เป็นอุปกรณ์ที่ใช้เชื่อมต่อกับอุปกรณ์ Zigbee เข้ากับคอมพิวเตอร์ โดยบทความนี้จะยกตัวอย่างการใช้งานกับ CC2531 USB Dongle
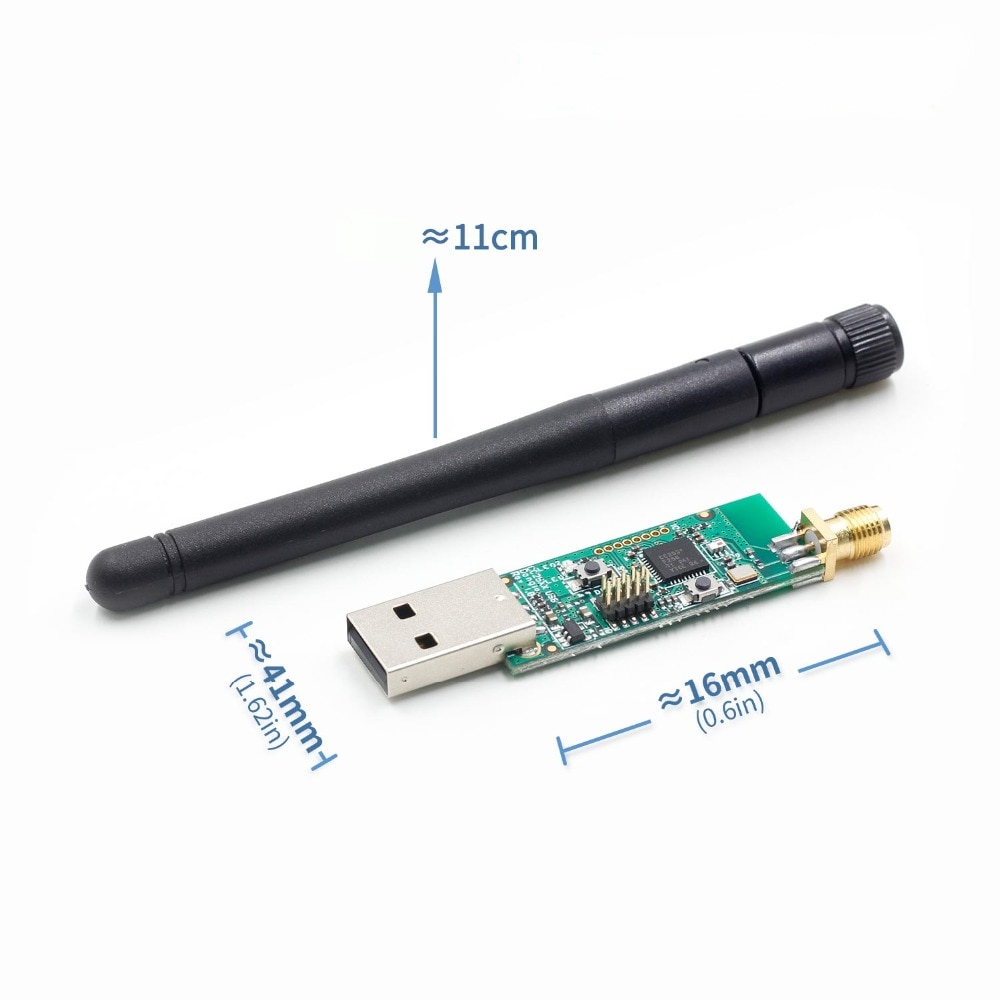
รูปภาพ CC2531 USB Dongle
การติดตั้ง Zigbee2MQTT สำหรับ Ubuntu ใน VirtualBox
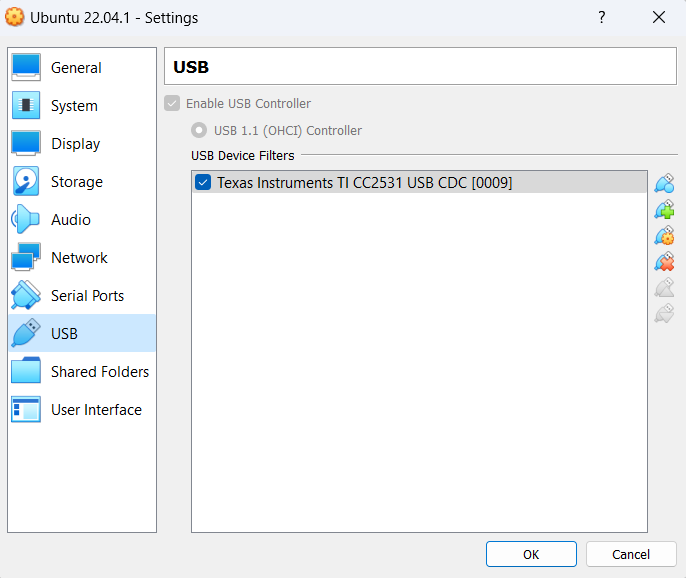
1. การที่ต้องการติดตั้ง Zigbee2MQTT เข้ากับ Virtual Machine ต้องทำให้ Virtual Machine เข้าถึง USB ในเครื่อง Host
2. ก่อนการติดตั้ง Zigbee2MQTT จำเป็นต้องติดตั้ง NodeJS ก่อน โดยมีคำสั่งในการติดตั้งดังนี้
  $ sudo apt install -y curl
  $ curl -fsSL https://deb.nodesource.com/setup_16.x | sudo -E bash -
  $ sudo apt install -y nodejs
3. ขั้นตอนการติดตั้ง Zigbee2MQTT โดยมีคำสั่งในการติดตั้งดังนี้
  # Clone the Zigbee2MQTT repository.
  $ git clone https://github.com/Koenkk/zigbee2mqtt.git

  # Move the zigbee2mqtt directory to /opt
  $ sudo mv zigbee2mqtt /opt

  # Change the owner of the /opt/zigbee2mqtt directory.
  $ sudo chown -R $USER:$USER /opt/zigbee2mqtt

  # Change the current directory to '/opt/zigbee2mqtt'.
  $ cd /opt/zigbee2mqtt

  # Install package dependencies
  $ npm ci
4. จากนั้นก่อนเริ่มต้นการทำงานของ Zigbee2MQTT ให้สร้างและเปิดไฟล์ data/configuration.yaml ภายใน Directory /opt/zigbee2mqtt เพื่อตั้งค่าการใช้งานสำหรับ Zigbee2MQTT
$ nano data/configuration.yaml
เขียนข้อความต่อไปนี้ในไฟล์
homeassistant: false
permit_join: true
mqtt:
  base_topic: zigbee2mqtt
  ## specify the IP address or hostname of your MQTT broker
  server: 'mqtt://localhost:1883'
  #user: xxxx
  #password: xxxx
serial:
  ## specify the serial COM port (e.g. /dev/ttyACM0, /dev/ttyUSB0)
  port: /dev/ttyACM0
advanced:
  ## specify the ZigBee channel number
  channel: 15
frontend:
  ## enable Web front-end for Zigbee2MQTT on port 8080
  port: 8080
5. ทำคำสั่งต่อไปนี้เพื่อเพิ่มชื่อผู้ใช้ให้มีสิทธิ๋เข้าถึงอุปกรณ์ที่เป็น Serial Port
  # Add the current user to the 'dialout' group
  $ sudo usermod -a -G dialout $USER
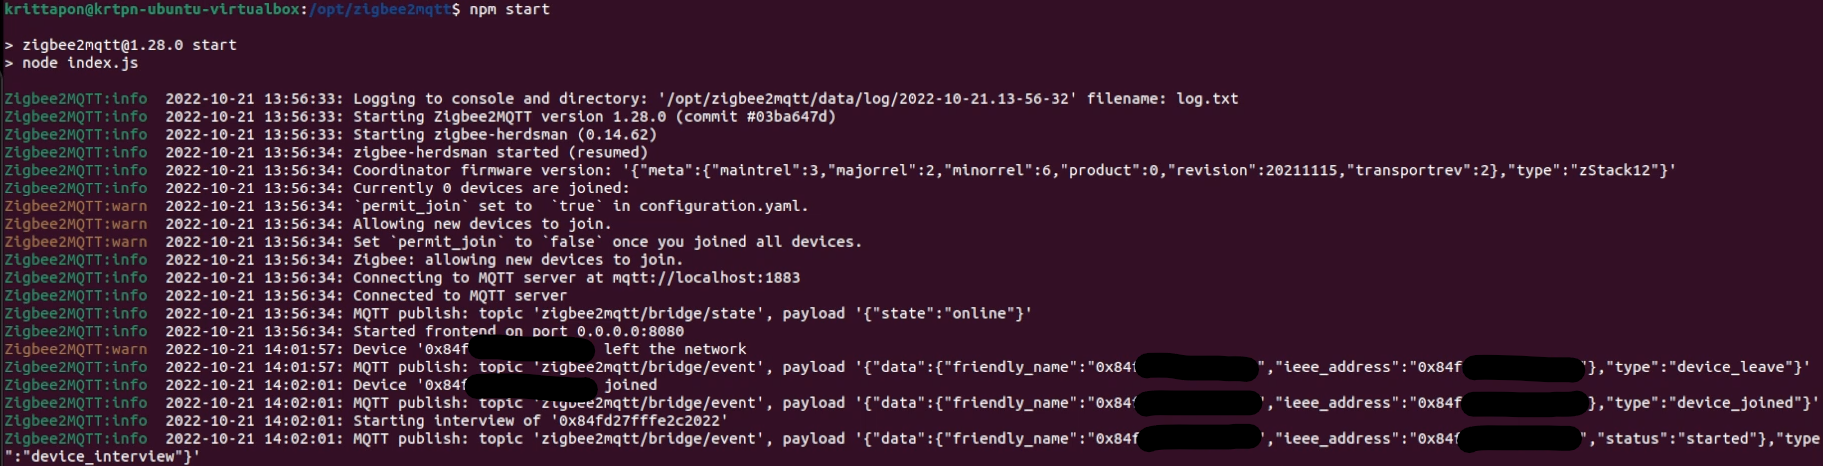
6. ลองทำคำสั่งต่อไปนี้เพื่อเริ่มทำงาน
  # Start ZigBee2MQTT
  $ npm start
รูปภาพเมื่อเริ่มทำงานเรียบร้อย
การทดลองเชื่่อมต่ออุปกรณ์ Zigbee เข้ากับ Zigbee Network
- การเชื่อมต่ออุปกรณ์ Zigbee ส่วนมากจะใช้การกดปุ่มด้านข้างอุปกรณ์ค้างไว้ประมาณ 5 วินาที ซึ่งจะมีสถานะบอกใน Terminal เมื่อมีอุปกรณ์เชื่อมต่อ
- โดยข้อมูลจากอุปกรณ์ Zigbee จะส่งมาในรูปของไฟล์ .json

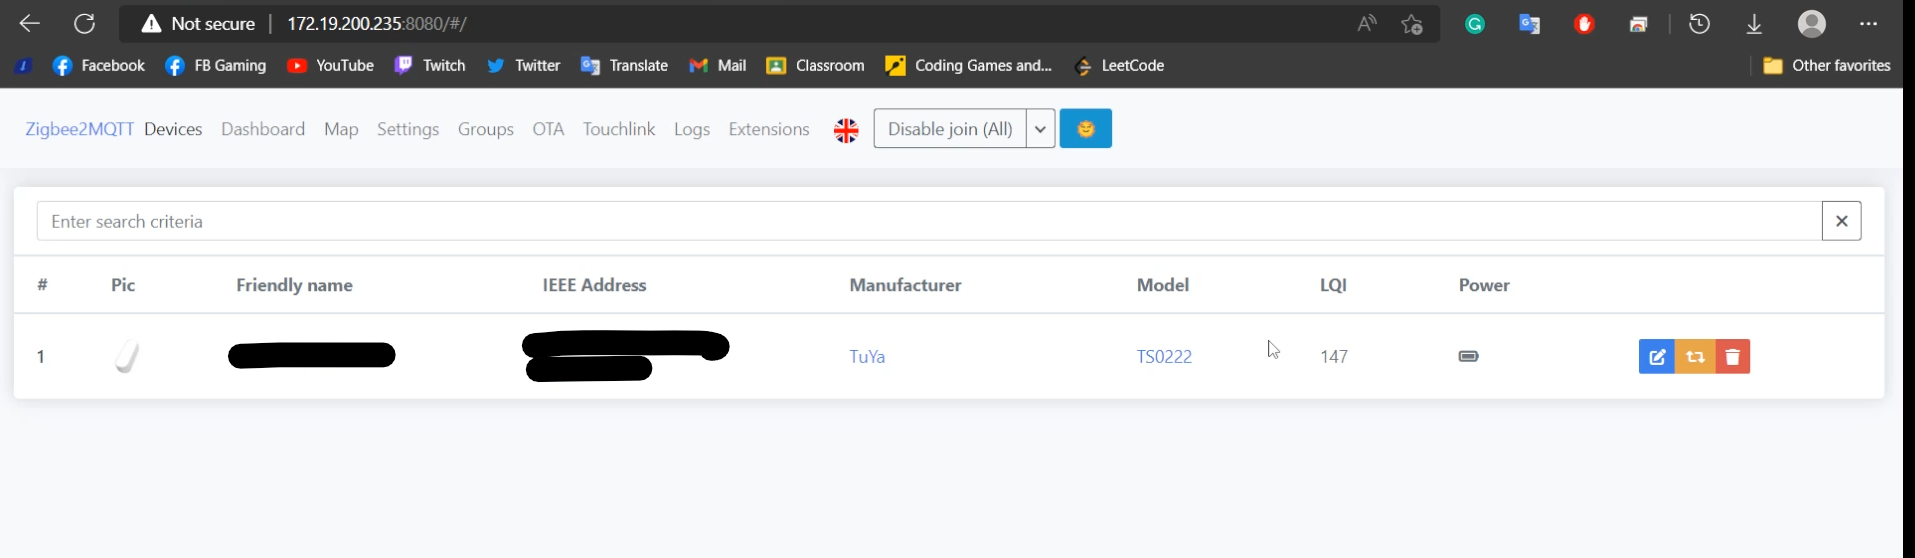
- จากนั้นลองเปิด Browser ที่เป็นหน้า Front End ของ Zigbee2MQTT ที่ลิงค์ localhost:8080 หรือ IP Address ของเครื่อง : Port 8080 เพื่อดูสถานะต่างๆของอุปกรณ์ Zigbee ที่วัดได้
การทดลองนำข้อมูลที่ได้จากอุปกรณ์ Zigbee มาแสดงผลที่ Node-red Dashboard
การนำอุปกรณ์ Zigbee โดยในบทความนี้จะใช้อุปกรณ์ที่สามารถวัดค่าความสว่างให้แสดงผลที่ Node-red Dashboard โดยที่ Node-red Dashboard เป็น UI ในการแสดงผลต่างๆเบื้องต้น โดยมีขั้นตอนในการติดต้ั้งดังนี้
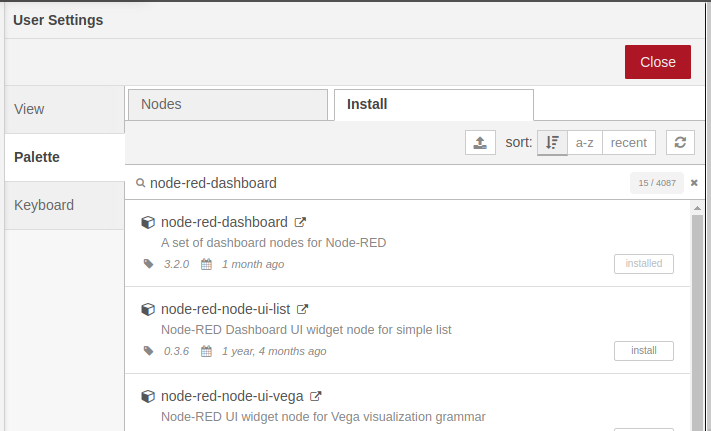
1. ไปที่หน้าต่างแสดงผลของ Node-red จากนั้นไปที่แถบ 3 แถบด้านขวาบน Manage pllette > Palette > Install จากนั้นพิมพ์ชื่อโมดูล node-red-dashboard แล้วกด install-red
2. เมื่อติดตั้งเสร็จ หน้าต่างแสดงผลจะอยู่ที่ localhost:1880/ui
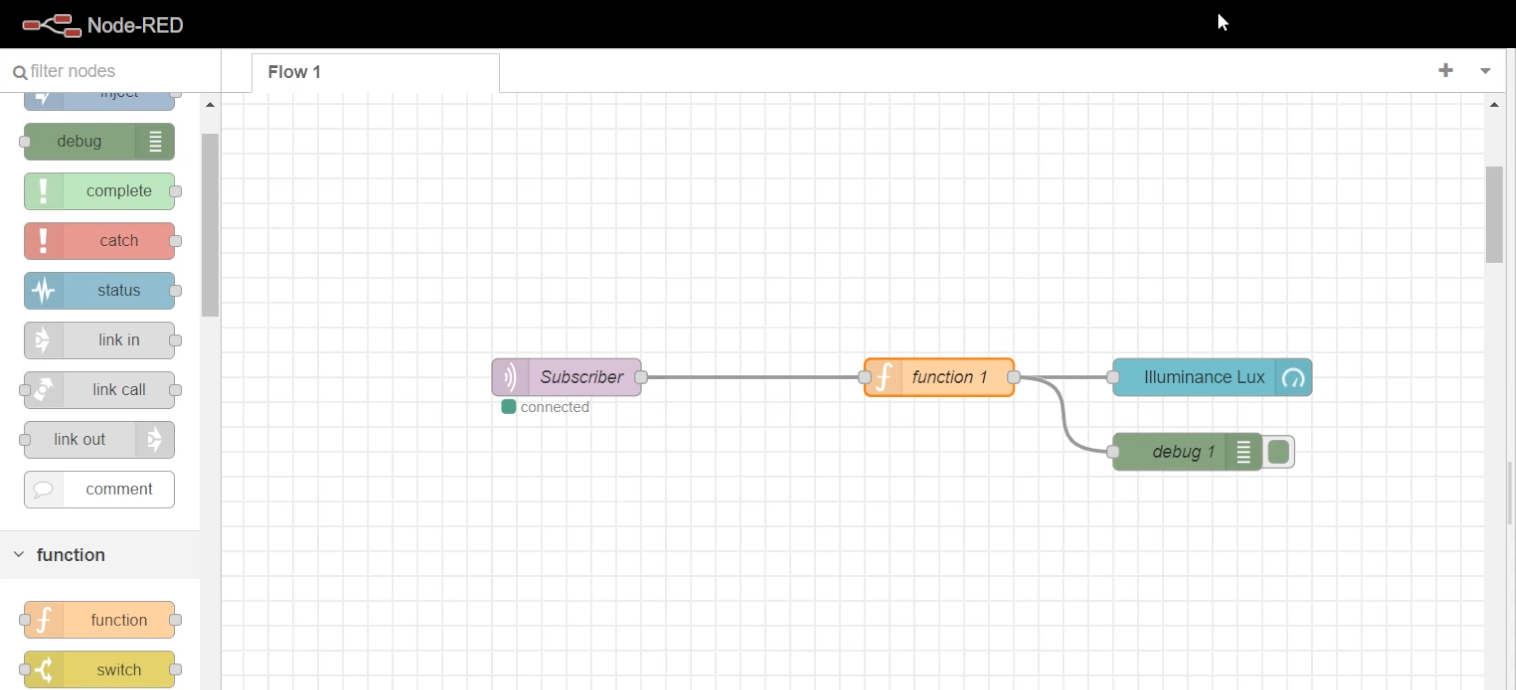
3. โดยตัวอย่าง Flow จะมีลักษณะตามรูปด้านล่าง
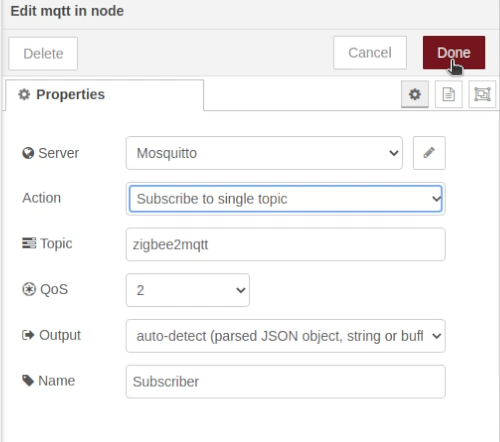
4. การ Configure โหนด MQTT Subscribe ตามรูปด้านล่าง
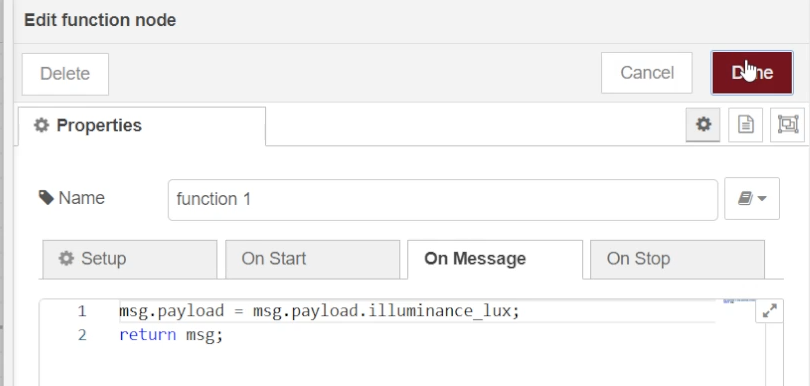
5. การ Configure โหนด Function ที่ทำหน้าที่แปลงข้อมูลที่เป็น json ให้กลายเป็นข้อมูลภายในไฟล์ json
msg.payload = msg.payload.illuminance_lux
return msg;
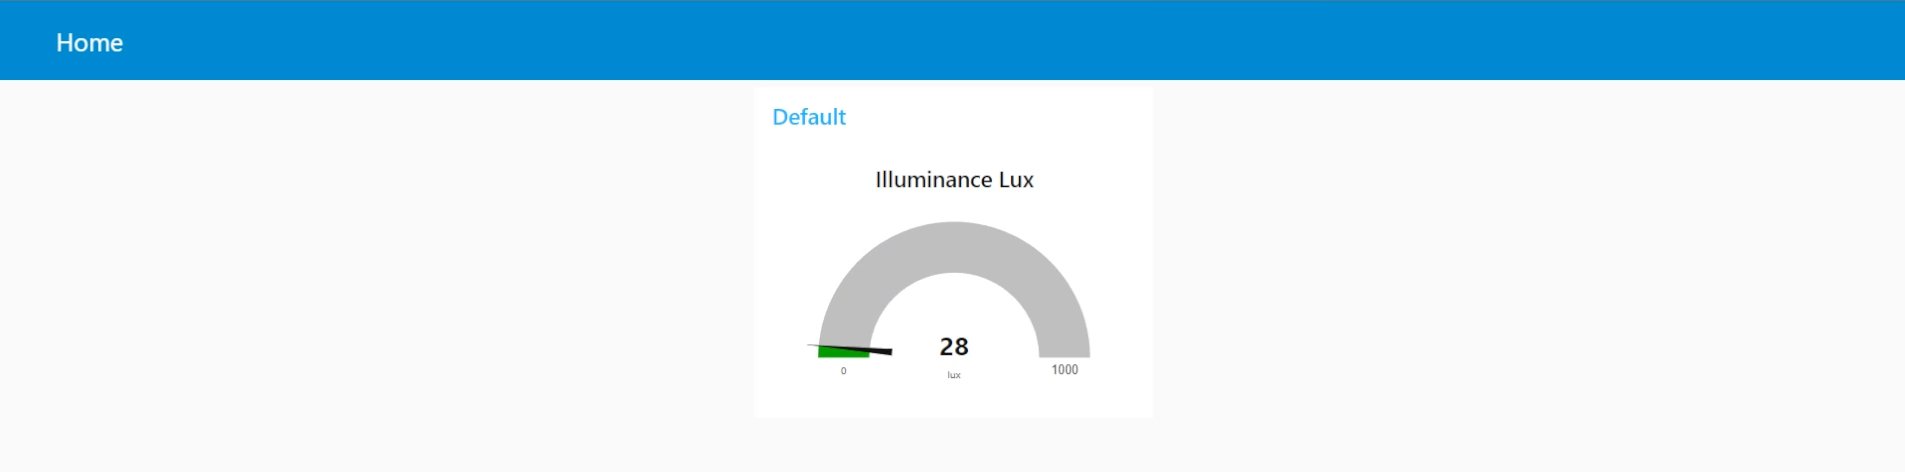
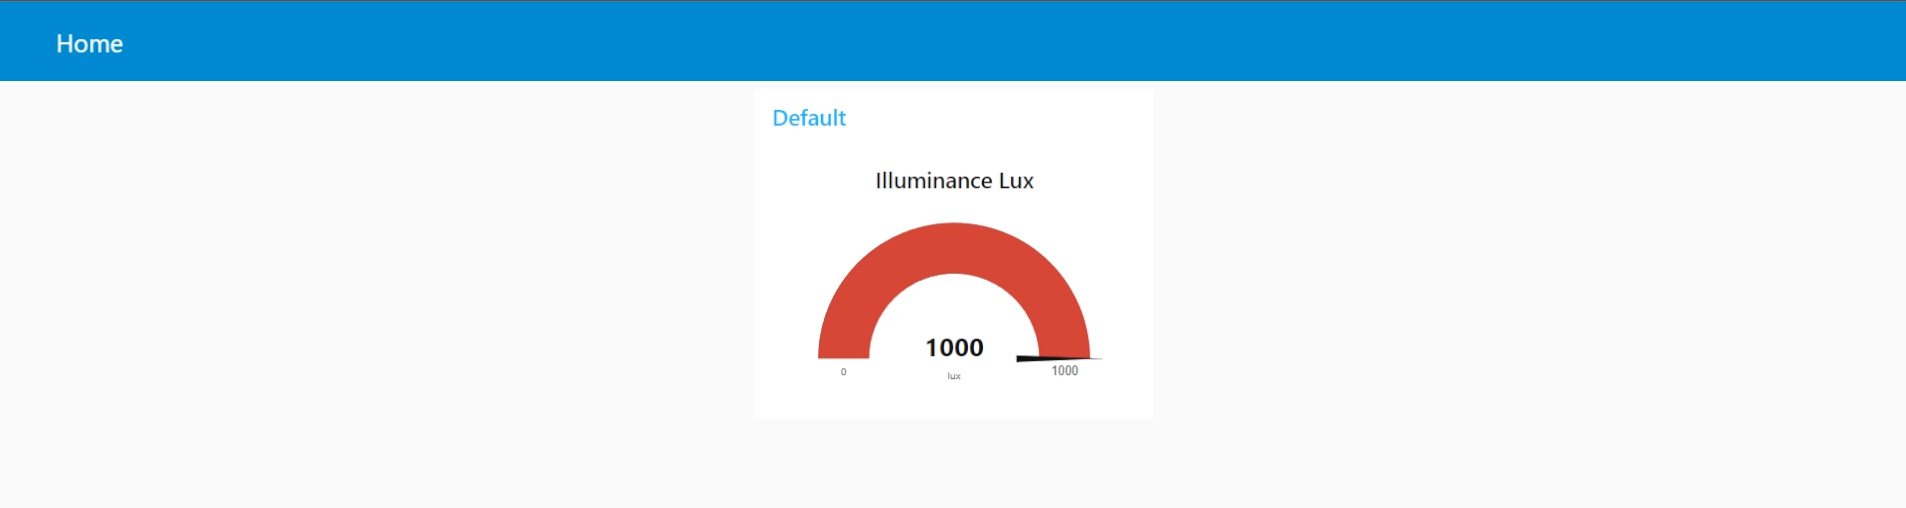
6. การ Configure โหนด Gauge ให้รับค่ามาแสดงผล
.png)
7. ผลลัพธ์ที่ได้จากการทำงาน
โค้ด Flow การทำงานในไฟล์ json
[
    {
        "id": "fc0e24ce8c0e468f",
        "type": "tab",
        "label": "Flow 1",
        "disabled": false,
        "info": "",
        "env": []
    },
    {
        "id": "a461a0248c86f96d",
        "type": "mqtt in",
        "z": "fc0e24ce8c0e468f",
        "name": "Subscriber",
        "topic": "zigbee2mqtt",
        "qos": "2",
        "datatype": "auto-detect",
        "broker": "373c28f3ff7a7b84",
        "nl": false,
        "rap": true,
        "rh": 0,
        "inputs": 0,
        "x": 240,
        "y": 340,
        "wires": [
            [
                "1f5f03c1a582343d"
            ]
        ]
    },
    {
        "id": "1f5f03c1a582343d",
        "type": "function",
        "z": "fc0e24ce8c0e468f",
        "name": "json to guage",
        "func": "msg.payload = msg.payload.illuminance_lux;\nreturn msg;",
        "outputs": 1,
        "noerr": 0,
        "initialize": "",
        "finalize": "",
        "libs": [],
        "x": 480,
        "y": 340,
        "wires": [
            [
                "c2de2a025b732fb4"
            ]
        ]
    },
    {
        "id": "c2de2a025b732fb4",
        "type": "ui_gauge",
        "z": "fc0e24ce8c0e468f",
        "name": "",
        "group": "aa9e992a3df8f0e6",
        "order": 0,
        "width": 0,
        "height": 0,
        "gtype": "gage",
        "title": "Illuminance Lux",
        "label": "lux",
        "format": "",
        "min": 0,
        "max": "1000",
        "colors": [
            "#00b500",
            "#e6e600",
            "#ca3838"
        ],
        "seg1": "",
        "seg2": "",
        "className": "",
        "x": 740,
        "y": 340,
        "wires": []
    },
    {
        "id": "373c28f3ff7a7b84",
        "type": "mqtt-broker",
        "name": "Mosquitto",
        "broker": "localhost",
        "port": "1883",
        "clientid": "nodered_demo",
        "autoConnect": true,
        "usetls": false,
        "protocolVersion": "4",
        "keepalive": "60",
        "cleansession": true,
        "birthTopic": "",
        "birthQos": "0",
        "birthPayload": "",
        "birthMsg": {},
        "closeTopic": "",
        "closeQos": "0",
        "closePayload": "",
        "closeMsg": {},
        "willTopic": "",
        "willQos": "0",
        "willPayload": "",
        "willMsg": {},
        "userProps": "",
        "sessionExpiry": ""
    },
    {
        "id": "aa9e992a3df8f0e6",
        "type": "ui_group",
        "name": "Illuminance",
        "tab": "3337181993a23654",
        "order": 1,
        "disp": true,
        "width": "6",
        "collapse": false,
        "className": ""
    },
    {
        "id": "3337181993a23654",
        "type": "ui_tab",
        "name": "Home",
        "icon": "dashboard",
        "disabled": false,
        "hidden": false
    }
]